Pose Estimation
Introduction: This project explores the latest technology behind pose estimation. Pose estimation uses machine learning to estimate the pose of a person or animal by looking at key joint positions in the body. This project consists of 2 parts: this blog post, and a demonstration of pose estimation.
- Spotlight Presentation
- Abstract
- Background
- Models
- Innovations - Modern Architectures
- Application
- Google Colab Demo
- Results and Discussion
- Conclusion
- Relevant Research Papers
- Reference
Spotlight Presentation
Below, is a link to the video overview of the article and google colab demo of pose estimation. Spotlight video
Abstract
In this project, I explored the background knowledge necessary for implementing pose estimation, some models that implement pose estimation, innovations in pose estimation, applications of pose estimation as well as a demonstration that shows pose estimation in use.
Background
Pose estimation works by detecting and tracking the position and orientation of human body parts in images or videos.
This section will go over the background applications of pose estimation, terminology, and modeling techniques.
Bottom Up vs Top Down
All approaches for pose estimation are either bottom-up or top-down methods
- Bottom-up methods of pose estimates each body joint first before grouping them together to form a unique pose.
- Top-down methods of pose esimtation runs a person detector first and then estimates body joints within the detected bounding boxes
Instance Segmentation
Instance segmentation plays an important role in pose estimation. Instance segmentation is a technique that uses bounding boxes to seperate different objects in an image or a video. After seperating out objects, instance segementation assigns each box a unique label which can be helpful because different objects may have different poses which needs seperate algorithims.
Human Body Model
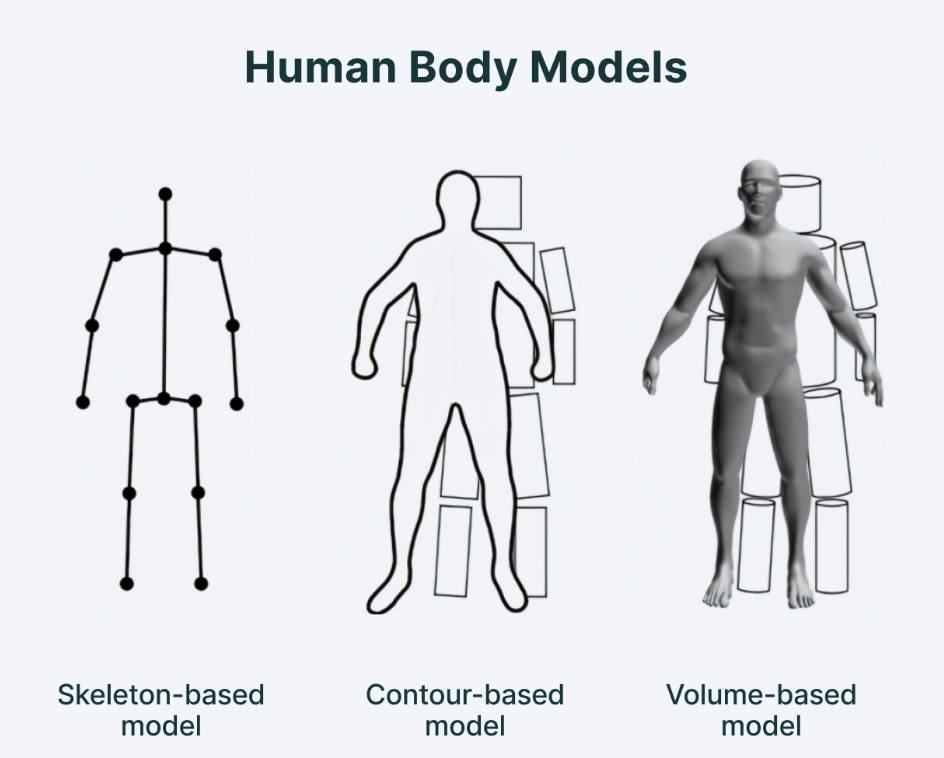
- Skeleton-based model (Kinematic model)
- Used for 2D and 3D representations
- Most flexible reprentation
- Consists of a set of joints (ankles, knees, shoulders, elbows, wrists and limb orientations)
- Contour-based model (Planar model)
- Used for 2D applications
- Contour is detected in an image/video using image processing techniques like edge detection or region based segmentatoin
- Contour can be represented as a set of coordinates. Polygonal approximations can be used applied to these coordinates to create the contour
- Volume-based model (Volumetric model)
- Pose estimation algorithim estimates 3D position and orientation of the object directly in 3D space instead of a 2D space
- Photogrammetry or laser scanning can be used to create a 3D model which is used to generate the volumetric representation of the object
- Can be computationally expensive to compute and manimpulate and may require special hardware/software for processing 3D volumetric data
Challenges
There are several different factors that can make pose estimation difficult. Some of these include:
- Occlusion: if the body is partially or fully blocked by something, OpenPose struggles to correctly identify it
- Low lighting conditions: if lighting conditions are poor, it can affect the quality of the image, thus making it difficult for OpenPose to detect key points accurately
- Complex poses: if a person is in a complex pose (ie. twisted, folded limbs, etc) it can be difficult for OpenPose to accurately detect all key points
- Clothing: Baggy clothing that covers key points makes it difficult for OpenPose to accurately detect key points
- Camera angle and distance: if camera is placed at an angle or distance from the subject it can affect OpenPose’s accuracy
Datasets
Some commonly used datasets for pose estimation include but are not limited to:
- COCO (Common Objects in Context) Keypoints: contains over 200,000 annotated images for objects and people. 17 keypoints for each person: nose, eyes, shoulders, elbows, wrists, hips, knees, and ankles
- MPII Human Pose: Contains around 25,000 images of people in everyday situations. Annotated keypoints for 16 body joints such as head, neck, shoulders, elbows, wrists, hips, knees, and ankles
- Human3.6M: contains 3.6 million images with 3D pose annotations for 15 body points captured by a motion capture system
Models
Now that we have some intutition and background on how pose estimation works, we will now look at how some pose estimation models.
OpenPose
OpenPose [1] was the first ever open-source realtime system for mult-person 2D pose dectection. OpenPose was developed by CVC at the Autonomous University of Barcelona (UAB) in collaboration with the Perception team at Carnegie Melon University.
Although OpenPose is no longer the cutting edge model of pose estimation, it’s still important to understand how OpenPose works in order to understand successive models, as well as understand how to approach pose estimation.
Method
OpenPose is a bottom up model. The below figure, illustrates the overall pipeline of the OpenPose method.

- (a) system takes an input which is a color image of size w x h.
- (b) feedforward network predicts a set of 2D confidence maps of body part locations
- (c) degress of association between parts is encoded into part affinity fields (PAFs)
- (d) greedy inference parses the confidence maps and PAFs and bipartite matching is used to associate body part candidates
- (e) 2D anatomical keypoints for all people in the image are produced
Network Architecture
Now that we have a general idea of the pipeline of OpenPose, we can now delve into the technical details of the architecture.
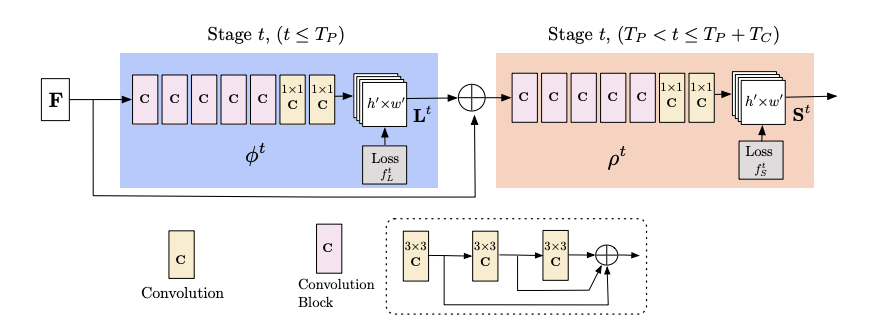
The architecture is shown above. Affinity fields are iteratively predicted with intermediate supervision at each stage. The affinity fields encode part-to-part association (shown in blue) and detection confidence maps (shown in begie) such that the PAFs are a set of 2D vectors that show the orinetation and location of limbs over the image domain.
The convolution block in the above image is comprised of 3 consectuvie 3x3 kernels. The output of each of these 3 convolutional kernels is also concatenated.
Simultaneous Detection and Association
Before the first stage, feature extraction is performed by the VGG-19 CNN which generates a set of feature maps F which is used as input to the first stage.
At the first stage, the network produces a set of PAFs L1 = Φ 1(F) where L1 refers to the PAFs at stage 1 and Φ 1 refers to the CNN at stage 1. In each subsequent stage, the predictions of the previous stage and the original image features F are concatenated in order to refine the predictions.
Lt = Φ t(F, Lt-1), for all 2 ≤ t ≤ T P
Where Φ t refers to the CNNs for inference at Stage t and Tp refers to the total number of PAF stages. A similar process is repeated to create confidence maps after Tp iterations.
STp = ρt(F,LTp) for all t = Tp
St = ρt(F,LTp, St-1) for all TP < t ≤ TP + TC
where ρt refers to the CNNs for inference at Stage t and TC refers to the total number of confidence map stages
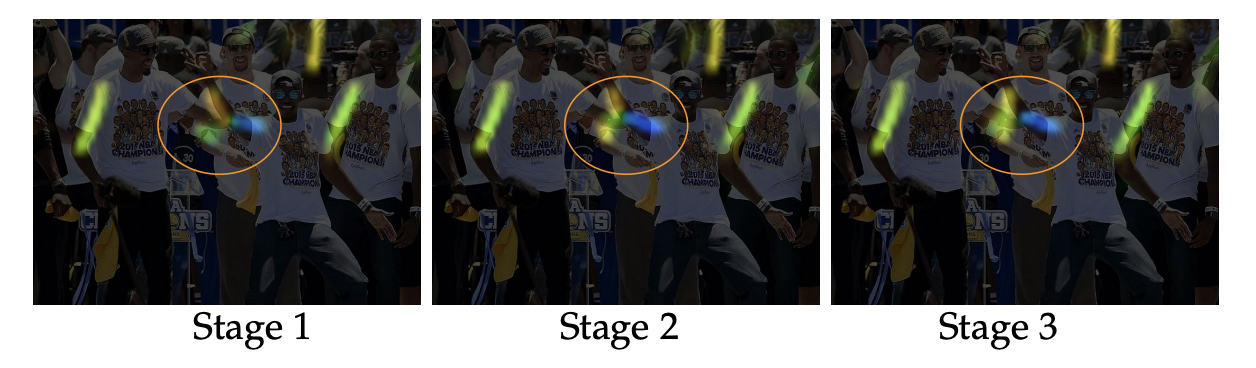
The refinement of the affinity fields across stages is shown above. Initially, there is confusion between the left and right body parts and limbs in the early stages However, the estimates become increasingly refined through global inference in later stages.
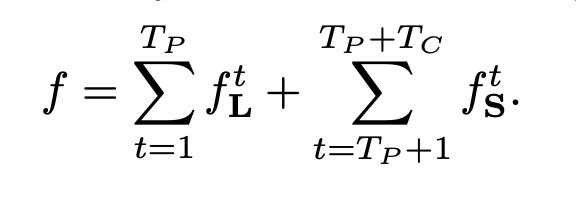
Now, we can take a look at the loss function. To guide the network to iteratively predict PAFs of body parts and confidence maps, we apply a loss function at the end of each stage. An L2 loss is used between the estimated predictions and the groundtruth maps and fields. The loss function of the PAF branch at stage ti and loss function of the confidence map branch at stage tk are

Intermediate supervision at each stage replenishes the gradient periodically in order to prevent vanishing gradients.
The eventual goal is
Mask R-CNN
Mask R-CNN [2] is an extension of Faster R-CNN and is used to to perform image segmentation on images. Because Mask R-CNN segments an image semantically (by pixels) or instantially (by image objects), it is relatively easy to apply Mask R-CNN to pose estimation.
Mask R-CNN extends Faster R-CNN by adding an additional branch that aims to predict object masks which are pixel-level binary masks that indicate which pixels belong to particular object instances. Object masks are used in addition with bounding boxes and class labels in order to accurately segment an image.
In particular, a CNN performs feature extraction on an image. After features have been extracted, a RPN (Region Proposal Network) generates bounding box candidates where objects could be. Features are reduced to be of similar size before being run in parallel in order to get mask proposals. These mask proposals are then used to create binary masks of where an object is and isn’t in the image. Combined with the person’s location, key points are extracted via segmenting and are used to create a human skeleton for each figure.
This is a top-down approach because it first extracts the features of a person before estimating body joints within detected bounding boxes.
Innovations - Modern Architectures
Although these are not my innovations, I wanted to briefly talk about some of the more modern architectures:
- HigherHRNet [3] is a bottom up model of pose estimation. HigherHRNet uses high-resolution feature pyramids to learn scale-aware representations. It uses multi-resolution supervision for training and multi-resolution aggregation for inference.
- KP3D [4] is a 3D pose estimation that uses a 2D image to predict the coordinates of a 3D object.
- Image Acquisition - acquire a set of images of the 2D image taken from different viewpoints
- Key-point detection - Using feature detection techniques, detect distinct key points in a 2D image. These points should be easily detectable and matched across different images
- Key-point Matching - Match the key points between images.
- 3D reconstruction - Once key point matching has been done, trinagulation is done to compute the 3D position of each key-point in the view. This is done by using correspondence between key-points and the known camera coordinates
- Refinement - Refine the 3D model by optimizing camera parameters and 3D point positions in order to minimize loss.
Application
In traditional object detection, people are only perceived as a square bounding box. However, using pose estimation allows computers to develop an understanding of human body language.
Some applications of pose estimation include:
- Human activity estimation - tracking and mesuring human activity and movement
- Can analyze dance techniques (ex. hip hop)
- Asses quality of surgieres in medical applications
- Fitness applications to detect form of exercises and count repetitions
- Full body/sign language communication (ex. ASL, traffic policemen signals, etc)
- Augmented Reality and Virtual Reality
- users can virtually learn how to play games like tenis via virtual tutors
- augmented reality - US army uses pose estimation with AR to model combat
- Training Robots with Human Pose Tracking
- Pose estimation can be used to help robots learn to do certain things
- Gaming
- Human subjects can auto-generate and inject poses into the game environment for an interactive gaming experience (ex: Microsft Kinect uses 3D pose estimation to track players’ motion and uses it to render the actions of the characters in game)
Google Colab Demo
This demo is an interactive demonstration of pose estimation. This notebook was adapted for the needs of this project, and I would like to give credit to the original creators of this notebook. More details can be found in the notebook itself.
This demonstration makes use of OpenCV and OpenPose in order to perform pose estimation on images.
Results and Discussion
In my demonstration, I found the pose estimation of three different images. Overall, the model was able to calculate some pose estimates for each of the images with varying degrees of success.
Through my demonstration, as well as prior research, I have identified several points that make it difficult for a pose detector to create a pose estimation of an image.
- Occlusion: if the body is partially or fully blocked by something, OpenPose struggles to correctly identify it
- Low lighting conditions: if lighting conditions are poor, it can affect the quality of the image, thus making it difficult for OpenPose to detect key points accurately
- Complex poses: if a person is in a complex pose (ie. twisted, folded limbs, etc) it can be difficult for OpenPose to accurately detect all key points
- Clothing: Baggy clothing that covers key points makes it difficult for OpenPose to accurately detect key points
- Camera angle and distance: if camera is placed at an angle or distance from the subject it can affect OpenPose’s accuracy
Easy Detection
This image does not have any occlusion, low lighting conditions, complex poses, baggy clothing, or bad/far camera angles and distance.
The original image before pose estimation looked like this:
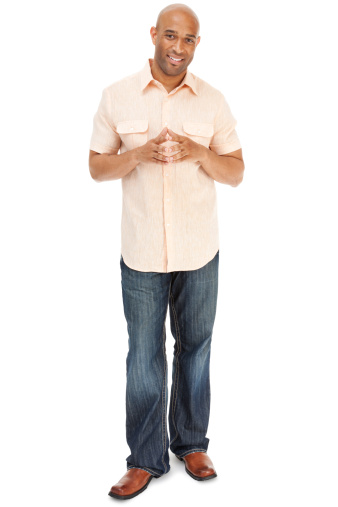
After pose estimation detector:

Based off these results, it seems that the pose detector was able to accurately create a pose estimation for the given image. For example, the after picture shows that the pose detector was accurately able to identify most key joints such as eyes, ears, nose, neck, shoulder, elbows, wrists, hips, knees, and ankles.
It is worth noting that the man’s left wrist was not detected at all, however, all other key joints identified in the BODY_PARTS dictionary were correctly identified. I am not sure why the man’s left wrist was not detected by the pose detector as it is not occluded, the lighting is not poor, the man is not in a complex pose, the clothing is not baggy and the camera is not far and does not have a strange angle. This may have just been caused by an error in the OpenPose detection with no fault to the image.
Occlusion
Occlusion: if the body is partially or fully blocked by something, OpenPose struggles to correctly identify it
This image is of a man occluded by the door of his car
The original image before pose estimation looked like this:

After pose estimation detector:
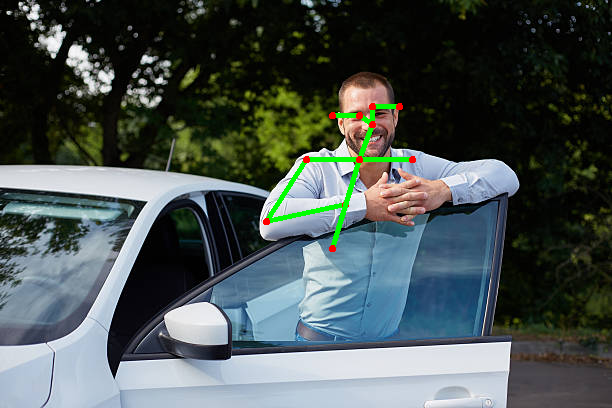
Based off these results, we see that the pose detector was able to accurately identify the key joints that were not occluded by the car door, and was unable to identify the key joints that were occluded by the car door. These results were expected as it would not be possible for OpenPose toclassify joints that it was unable to see/detect.
Low Lighting
Low lighting condtions: if lighting conditions are poor, it can affect the quality of the image, thus making it difficult for OpenPose to detect key points accurately
This image is of a man in low lighting.
The original image before pose estimation looked like this:

After pose estimation detector:
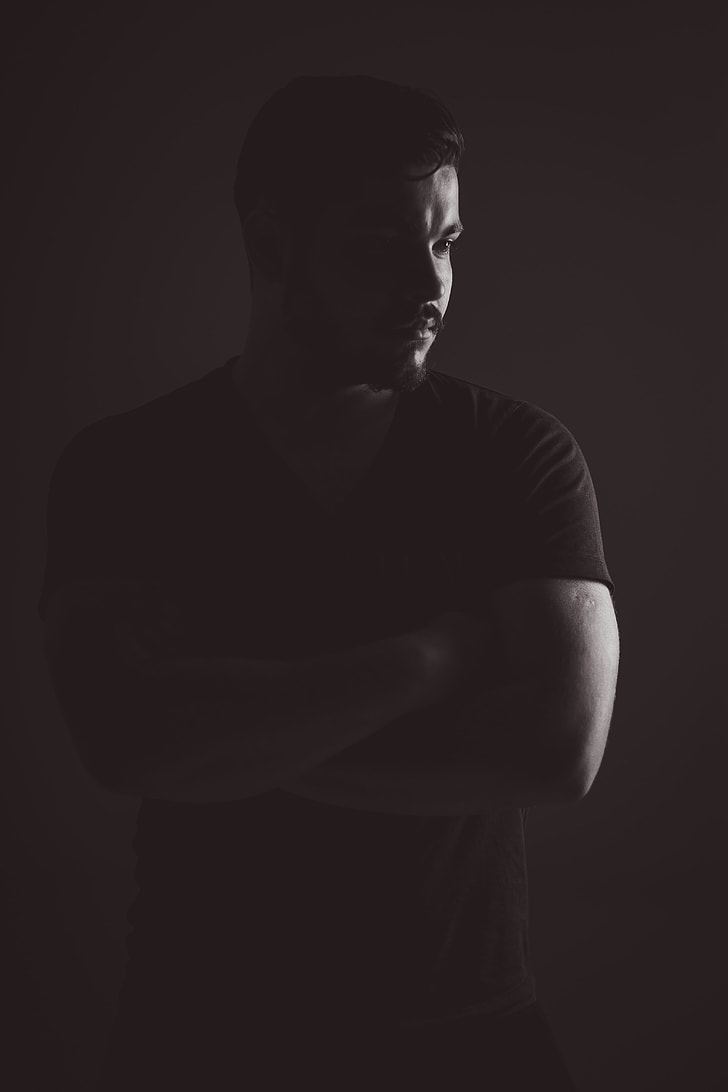
As seen in the results, the pose detector was unable to detect any key points of the man in low lighting. This is because OpenPose relies on computer vision algorithims that analyze images and detect key points. Low lighting may make it difficult to detect key points because it can result in more noise in the image which can obscure key data points. In addition, because there is not a lot of contrast in the image, it may be difficult for the pose detector to accurately identify what are key points and what is part of the background.
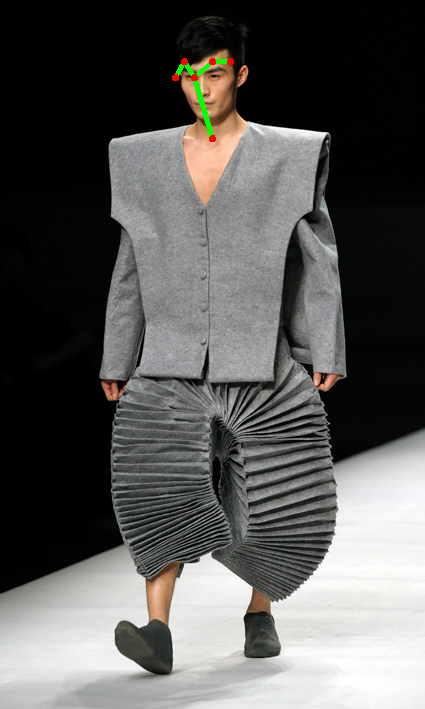
Complex Pose
Complex poses: if a person is in a complex pose (ie. twisted, folded limbs, etc) it can be difficult for OpenPose to accurately detect all key points
This image is taken of a man in a complex dance move.
The original image before pose estimation looked like this:
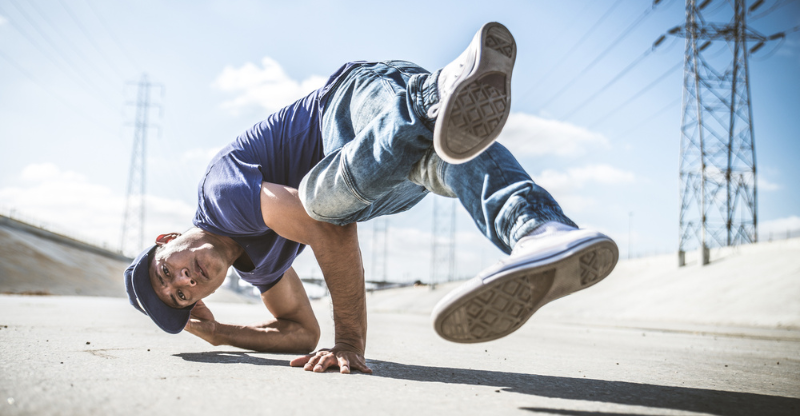
After pose estimation detector:
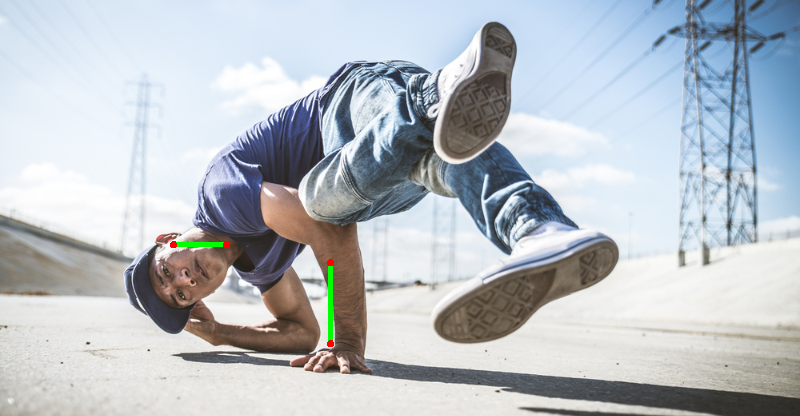
Based off these results, we see that the pose detector was able to identify some key joints while not being able to detect others. These results were expected as OpenPose may struggle to detect key points of an image of a person in a complex pose because these points may be distorted or occluded. In this case, almost all of the dancer’s key joints are distorted or occluded by other body parts. For example, the man’s legs, hips, and shoulders appear to be distorted due to the pose that he is hitting. In addition, one of the man’s knees is occluded by his foot. In addition, although the man’s eyes, ears, and nose are not occluded or distorted, due to the complex pose that he is in, OpenPose is strugging to accurately identify these features.
Clothing
Clothing: Baggy clothing that covers key points makes it difficult for OpenPose to accurately detect key points This image is of a man in baggy/boxy clothing that obscures his figure.
The original image before pose estimation looked like this:
After pose estimation detector:
Based off these results, we see that the pose detector was unable to detect any of the key points related to the body such as the shoulders, elbows, wrists, hips, knees, or ankles. However, it was able to detect the ears, eyes, nose, and neck. I believe that OpenPose struggles with baggy/boxxy clothing because it can obscure body parts, making it difficult for OpenPose to locate body parts. For example, the body parts that were not obscured by clothing were easily recognized while the parts that were hidden by the clohting were unidentifiable.
Camera Angle/Distance
Camera angle and distance: if camera is placed at an angle or distance from the subject it can affect OpenPose’s accuracy This image is of a person taken from a far distance
The original image before pose estimation looked like this:

After pose estimation detector:
Based off these results, we see that the pose detector was unable to detect any of the key points. I believe that this is because the person is too far away for the OpenPose to accurately locate and identify their body parts.
Conclusion
Baed off the above results, it appears that the best way to get good results is to ensure that the image you want to perform pose estimation on meets the following criteria: no occlusion, good lighting, no complex poses, clothing does not obscure person’s figure, good camera angle and distance. The first image which met all of these criterias, had the best results in terms of pose estimation.
Relevant Research Papers
OpenPose: Realtime Multi-Person 2D Pose Estimation using Part Affinity Fields
- [Paper] https://arxiv.org/abs/1812.08008
- [Code] https://github.com/CMU-Perceptual-Computing-Lab/openpose
Learning Delicate Local Representations for Multi-Person Pose Estimation
- [Paper] https://arxiv.org/abs/2003.04030
- [Code] https://github.com/caiyuanhao1998/RSN
Dynamics-Regulated Kinematic Policy for Egocentric Pose Estimation
- [Paper] https://arxiv.org/abs/2106.05969
- [Code] https://github.com/KlabCMU/kin-poly
Mask R-CNN
- [Paper] https://arxiv.org/abs/1703.06870
HigherHRNet: Scale-Aware Representation Learning for Bottom-Up Human Pose Estimation
- [Paper] https://arxiv.org/pdf/1908.10357.pdf
Reference
[1] DCao, Zhe, et al. “OpenPose: Realtime Multi-Person 2D Pose Estimation using Part Affinity Fields” arXiv preprint arXiv:1812.08008 (2019).
[2] He, Kaiming, et al. “Mask R-CNN” arXiv preprint arXiv:2208.00571 (2022)
[3] Cheng, Bowen, et al. “HigherHRNet: Scale-Aware Representation Learning for Bottom-Up Human Pose Estimation” arXiv prepreint arXiv:1908.10357 (2020)
[4] Guo, Xiaodan, Yifei Zhu, and Yun Fu. “KP3D: Pose Estimation for 3D Models Using Keypoint Detection and 2D-to-3D Matching.” Proceedings of the IEEE Conference on Computer Vision and Pattern Recognition (CVPR), 2019, pp. 5530-5539.
Describe the difference between novices and experts